Did you know that you can make thick and completely vegan coconut caramel sauce from a can of coconut milk?


1 can coconut milk
Pure vanilla extract
Sweetener of choice
Pinch of salt
Just four or five ingredients, and you’re on your way to the perfect coconut caramel sauce, good for serving with fruit, pancakes, or over my Banana Ice Cream Recipes.
And the best part is that there’s NO heavy cream and NO high fructose corn syrup required for this recipe!
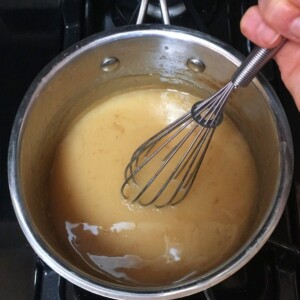
Above – Watch the video how to make coconut caramel!
Step One:
Combine all ingredients except vanilla extract in a medium saucepan, and whisk everything together.
Bring to a boil, then let it boil for around 3-4 minutes.

Step Two:
Turn to a simmer, and let the mixture cook down to about half its original volume, stirring as needed.
Turn off the heat, stir in the vanilla extract, and let the vegan caramel cool. Then refrigerate.

The homemade coconut caramel sauce will continue to thicken overnight.
Use it as you’d use caramel sauce.
It tastes absolutely amazing over homemade Coconut Ice Cream.

Or try it on top of this Frappuccino Recipe!
Stored in the refrigerator, the jar of vegan caramel sauce will last for at least a week.
I don’t know if it lasts longer or if it can be frozen, because I’ve never been able to keep a batch around long enough to find out!
")
Coconut Caramel Sauce
Ingredients
- 13.5 oz coconut milk (Coconut-free recipe here)
- 1/3 cup pure maple syrup, honey, or agave
- 1/4 cup brown sugar OR simply increase the above liquid sweetener to 2/3 cup
- 1/2 tsp pure vanilla extract
- 1/4 tsp salt
- optional 1 tbsp butter-type spread or coconut oil, for richer flavor
Instructions
- *Use the brown sugar (or coconut sugar) if you want more of a caramel flavor; however using all liquid sweetener still yields delicious results. Make sure to buy full-fat canned coconut milk, not lite or coconutmilk beverage.Combine all ingredients except the vanilla extract in a medium saucepan. Bring to a boil. Let it boil for around 3-4 minutes, stirring continuously, then lower to a simmer. Let it simmer—stirring as needed—until it cooks down to about half its volume and thickens. This usually takes around 50-60 minutes, depending on your climate, stove, and the fat content in your particular can of coconut milk. Turn off the heat, stir in the vanilla, and let it sit for about an hour. Cover and refrigerate overnight – it continues to thicken as it sits.Instant Pot Version: Combine all ingredients except vanilla in the instant pot, and use the sauté setting. Bring to a boil, stirring occasionally, and let cook down until thick, about 20 minutes. Turn off, and stir in the vanilla. Thanks to reader Jaclyn for creating this version and commenting to let us know it can be made in an instant pot!View Nutrition Facts
Video
Notes

More Healthy Desserts


I’ve made this a few times now and it turns out perfect each time. I love that you used coconut milk instead of dairy. I did use maple syrup and coconut palm sugar in mine. I put it on some warm apple crisp. Can’t get much better than that! I’m going to double the recipe next time. Thanks for the amazing recipes, Katie!!!
Wow! I had quite the experience with this caramel sauce! I was making it for a coconut ice cream, and decided to use coconut milk becuase we had so much of it. Origionally, I only saw the list of ingrediants at the top (without the quantities) and put everything in according to taste. After I followed the directions and the sauce was done, I noticed it was very thin. Looking to the bottom of the recipe, I saw the amounts listed and almost slapped my forehead! I then proceded to add the brown sugar (as listed), boiled and simmered it. It was still very thin and I was confused. I went onto google andlooked up how to thicken caramel. It said to put in cornstarch and water and stir. Well, to my surprise, that didn’t work! I decided that nothing could thicken this sauce, and I should just try boiling it again as a last attempt. After about 2 minutes, it was a thick, caramel-y consistency and I was ecstatic! If you had the same issue as me, try what I did and it might just work! Thanks for this recipe!
I have a true milk allergy (not lactose intol) by blood test. I love this alternative for caramel sauce.
I followed to the T. I was skeptical at the 25 min mark it would ever thicken up. However by 35 it deepened in color and began to thicken. It does take the full hour to come to desired consistency.
I also have a simmer burner on my stove which may have helped and I never left the stove by itself. I have great heavy pans but I ensured stirring every few mins to avoid burning/sticking.
Only problem is I wished I’d doubled the recipe!
Have you ever tried this in the instapot? Any idea on timing?
Hi Kelsey,
CCK put in the bottom of this recipe on how to make it in an instant pot.
I hope that helped.
Millie
Will this work with coconut milk in a paper carton?
PEANUT BUTTER CARAMEL SAUCE!!
I made the recipe (again for the umpteenth time)……to pour over ice cream for my husband’s birthday….and then decided I needed more toppings.
I made one with molasses which was wonderful . Dark and rich and velvety with the addition of a little butter.
And then I made a third batch and after adding double the vanilla I stirred in peanut butter powder for a rich Peanut Butter Ice Cream Sauce. I probably added almost half a cup of the PB2 powder because I wanted it to be really nutty……and now I need to do it all over again since my dad and I have almost polished off this sauce eating it with Fuji Apple Slices. Seriously yummy.
Thank-you for the fabulous recipe. I’m envisioning several new variations!!
Thank you so much for making it! Your version sounds even better!
MMMMMM. 🤤
That looks sooooooo good! Can you replace the coconut milk with cow/goat milk? And the butter type spread with cow butter? I’m going to try this for on top of a frapicchino.
Please get back to me ASAP!
Millie.
This caramel is INSANE!!! It takes me back to the last time I had non-vegan caramel sauce, I am seriously in love. It took the full hour to thicken up, but the taste was well worth the wait. It doesn’t taste like coconut in the slightest!!! I used regular coconut milk and was afraid it wouldn’t turn out the same but it ended up working great. I also used coconut sugar and maple syurp and the taste is just incredible. Thank you sooo much Katie, I’ll be eating this up before the day ends 💛
I just made this and waited the full hour for it to thicken up. After letting it cool and giving it a mix, I see that the oil (possibly from the coconut milk can or the butter) seperated on top. Do you think I cooked it for too long? Not sure what I did wrong.
A love treat like this always inspire and i truly appreciate the way you made this caramel. Looking forward for more such informative and yummy recipes in future too.
has anyone used this for caramel corn?
I used the brown sugar and maple syrup combo and added 1 T. homemade ghee. Excellent flavor and consistency! Thank you for a great recipe!
I’m confused about the Instant Pot instructions. I have no idea how to cool down for 20 minutes before I turn it off. I just thought there was “saute” and then off. Does anyone know how that works?
Amazing!! I used the instant pot method and it turned out nicely and only took 20 minutes to sauté. I used maple syrup and coconut sugar as my sweeteners and it created a very rich taste and darker color. Love this and will definitely make again! I could see using this in pecan pie as well. Thank you Katie and Jaclyn for this recipe!
Can I used Califia farms dairy free heavy whip in place of condensing milk?